How to Install a Sharkbite Fitting: Easy DIY Guide
Are you ready to make your plumbing projects easier and faster? Installing a Sharkbite fitting is one of the simplest ways to connect pipes without soldering or special tools.
Whether you’re fixing a leak or upgrading your pipes, this quick and reliable method can save you time and effort. In this guide, you’ll discover step-by-step instructions that anyone can follow. By the end, you’ll feel confident handling your plumbing like a pro.
Keep reading to learn how to install a Sharkbite fitting and get your pipes working perfectly in no time!

Credit: www.youtube.com
Tools And Materials Needed
Gathering the right tools and materials makes installing a Sharkbite fitting easier. These fittings are designed for quick and secure connections. Having everything ready helps avoid delays and mistakes. Below is a list of what you need to start.
Essential Tools
- Pipe cutter – to cut pipes cleanly and evenly
- Deburring tool – removes sharp edges from cut pipes
- Measuring tape – measures pipe length accurately
- Marker – marks where to cut the pipe
- Adjustable wrench – for tightening connections if needed
Choosing The Right Sharkbite Fitting
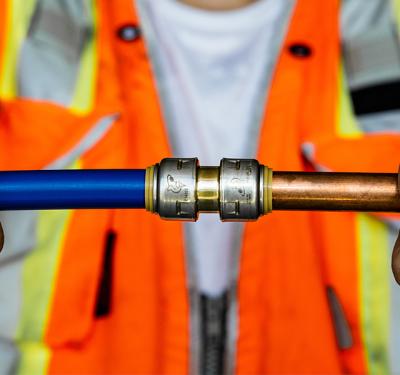
Select fittings that match your pipe type and size. Sharkbite fittings work with copper, PEX, and CPVC pipes. Check pipe diameter before buying. Common sizes are 1/2 inch, 3/4 inch, and 1 inch. Pick fittings that suit your plumbing layout and pressure needs.
Additional Supplies
- Cleaning cloth – wipes dirt and moisture off pipes
- Pipe insulation – protects pipes after installation
- Teflon tape – seals threaded connections if present
- Bucket – catches water during pipe cutting
- Safety gloves – protect hands during work
Preparing The Pipes
Preparing the pipes is a crucial part of installing a Sharkbite fitting. Proper preparation ensures a strong and leak-free connection. It involves stopping water flow, cutting the pipe correctly, and cleaning it well. Each task sets the stage for a smooth fitting process.
Turning Off Water Supply
Stop the water supply before starting any work on the pipes. This prevents water from spilling and causing damage. Locate the main valve and turn it off completely. Open nearby faucets to drain any remaining water from the pipes. This step keeps the work area dry and safe.
Cutting The Pipe
Use a pipe cutter to make a clean, straight cut. Avoid using a saw that may leave rough edges. Measure the length carefully to fit the Sharkbite fitting. Hold the pipe steady to prevent bending or cracking. A smooth cut helps the fitting attach securely.
Cleaning And Deburring
Remove any burrs or sharp edges from the cut pipe. Use a deburring tool or sandpaper for this task. Clean the pipe end with a cloth to remove dirt and grease. A smooth, clean surface improves the seal and prevents leaks. This step is key for a tight, reliable connection.
Installing The Sharkbite Fitting
Installing a Sharkbite fitting is straightforward, but paying attention to details ensures a leak-free connection. This section walks you through the critical steps to get the fitting in place securely and efficiently. Understanding each part of the process will save you time and prevent costly mistakes.
Marking The Insertion Depth
Before inserting the fitting, you need to mark the pipe to the correct depth. Sharkbite fittings come with a specific insertion depth that guarantees a proper seal.
Use the fitting itself as a guide by measuring from the edge of the pipe to the fitting’s stop point. Mark this distance clearly on your pipe with a pencil or marker.
Have you ever inserted a fitting only to find it leaks? Often, this happens because the pipe wasn’t inserted fully. Marking the depth eliminates this guesswork and ensures a snug fit.
Inserting The Fitting
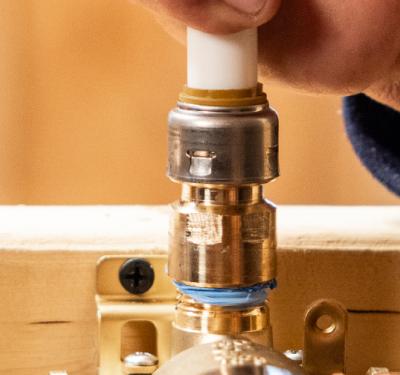
Once marked, push the pipe straight into the Sharkbite fitting. The connection is designed to be quick and tool-free, but it requires firm, steady pressure.
Make sure the pipe goes all the way to the mark you made earlier. If you feel resistance before reaching that mark, pull the fitting off and check for any debris or damage on the pipe.
Have you noticed how a proper push feels firm but smooth? This feedback helps you know when the fitting is correctly seated, avoiding future leaks.
Ensuring A Secure Fit
After insertion, gently pull on the pipe to verify that the fitting holds firmly. This simple check confirms the gripping teeth inside the fitting have locked onto the pipe.
If the pipe moves or slips, it’s a sign the connection isn’t secure. Remove the fitting, inspect the pipe for any burrs, and try again.
Remember, a solid connection doesn’t just prevent leaks; it prevents costly water damage. Take a moment to double-check your work—it’s worth the peace of mind.
Testing The Installation
After installing a Sharkbite fitting, testing the installation is crucial to ensure everything works perfectly. This step helps you catch any leaks or connection issues before they cause damage. Taking the time to carefully check your work gives you peace of mind and saves costly repairs down the line.
Turning On The Water
Slowly open the main water valve to let water flow through your newly installed fitting. Don’t rush this part; a gradual increase in water pressure helps prevent sudden shocks to the system. Watch and listen for any unusual sounds that might indicate a problem.
Checking For Leaks
Once water is flowing, carefully inspect all connections around the Sharkbite fitting. Use a dry cloth or paper towel to detect moisture. Even small drips can signal an improper seal that needs fixing.
Pay close attention to the joint areas where the pipe meets the fitting. If you spot any leaks, mark them and prepare to tighten or reseat the fitting.
Troubleshooting Common Issues
If you notice leaks, the most common cause is incomplete insertion of the pipe into the fitting. Push the pipe in firmly until it reaches the internal stop. Sometimes, removing and reinserting the pipe solves the problem.
Another issue could be damaged or dirty pipes. Clean the pipe ends and check for any dents or scratches before reinstalling.
Ask yourself: have you checked the pipe size matches the Sharkbite fitting? Using the wrong diameter can cause failures. Double-check your materials if leaks persist despite proper installation.
Tips For Long-lasting Connections
Ensuring a long-lasting connection with Sharkbite fittings depends on careful installation and ongoing care. Small actions during and after installation help keep your plumbing secure. Proper support and gentle handling prevent leaks and damage over time.
Proper Pipe Support
Supporting pipes correctly reduces strain on fittings. Use pipe clamps or brackets to hold pipes firmly in place. Avoid letting pipes hang or bend near the Sharkbite fitting. Secure pipes at regular intervals to stop movement.
- Space supports every 3 to 4 feet for copper pipes.
- Use cushioned clamps to prevent pipe damage.
- Check support points during installation and after.
Avoiding Stress On Fittings
Stress from pulling or twisting can weaken fittings. Handle pipes gently when connecting Sharkbite fittings. Never force pipes into fittings or bend near joints. Allow space for natural pipe expansion and contraction.
- Do not tighten fittings too much; hand-tight is enough.
- Keep pipes aligned to avoid pressure on fittings.
- Check for signs of strain or cracks regularly.
Regular Maintenance
Regular checks help catch issues early. Look for leaks, corrosion, or loose fittings. Clean around the fittings to prevent dirt buildup. Replace damaged parts quickly to avoid bigger problems.
- Inspect fittings every six months or after temperature changes.
- Use a damp cloth to clean fittings gently.
- Test water pressure to ensure stable flow.
Credit: www.tiktok.com
Credit: www.sharkbite.com
Frequently Asked Questions
What Tools Do I Need To Install A Sharkbite Fitting?
You only need a pipe cutter and a deburring tool. Sharkbite fittings don’t require soldering or glue. These tools ensure a clean, smooth pipe end. This makes the fitting secure and leak-free.
Can I Use Sharkbite Fittings On Copper Pipes?
Yes, Sharkbite fittings work well on copper pipes. They also fit PEX and CPVC pipes. This versatility makes them ideal for various plumbing repairs and installations.
How Do I Prepare Pipes Before Installing Sharkbite Fittings?
Cut the pipe straight and remove burrs with a deburring tool. Clean the pipe surface to ensure a tight seal. Proper preparation prevents leaks and ensures fitting durability.
Are Sharkbite Fittings Reliable For Long-term Use?
Yes, Sharkbite fittings are durable and reliable for years. They are tested to meet plumbing standards. Proper installation ensures a strong, leak-proof connection over time.
Conclusion
Installing a Sharkbite fitting is simple and quick. Just follow the steps carefully and check for leaks. These fittings save time and do not need special tools. You can fix or change pipes easily with Sharkbite parts. Always turn off water before starting the job.
Take your time and work safely. Soon, your plumbing will be ready without hassle. Give it a try and see how easy it is. No need to call a plumber for small repairs anymore.