Thinking about giving your floors a fresh, stylish look without spending a fortune? Vinyl flooring might be the perfect choice for you.
But how do you make sure it fits perfectly and looks professional? You’re about to discover simple, clear steps that will help you install vinyl flooring with confidence. Whether you’re a beginner or just want to avoid common mistakes, this guide will make the process easier than you ever imagined.
Ready to transform your space? Let’s dive in!
Credit: www.califloors.com
Preparation
Preparation is the foundation of a successful vinyl flooring project. Skipping this phase can lead to uneven surfaces, poor adhesion, and a finish that doesn’t last. Taking the time to prepare properly saves you frustration and ensures a professional-looking result.
Gather Necessary Tools
Before you start, make sure you have all the tools ready. This includes a tape measure, utility knife, straight edge, chalk line, roller, and adhesive if your vinyl requires it. Having everything on hand prevents interruptions and keeps your momentum going.
Think about the tools you might overlook, like a knee pad for comfort or a putty knife for smoothing edges. These small additions can make the work easier and improve your outcome.
Inspect Subfloor Condition
Your subfloor must be clean, dry, and smooth before laying vinyl. Look for cracks, bumps, or moisture issues that could cause problems later. Even tiny imperfections can telegraph through vinyl, ruining the look.
If you find damage, repair it with a leveling compound or replace sections as needed. Ignoring subfloor problems is like building on shaky ground—it compromises your entire project.
Measure The Room
Accurate measurements are crucial to avoid running short or wasting material. Measure length and width at several points to account for irregular shapes. Don’t forget to include closets or alcoves in your calculations.
Write down your measurements and add 10% extra for cutting mistakes and future repairs. Have you ever started cutting only to realize you didn’t have enough material? Avoid that hassle by measuring twice and planning accordingly.
Choosing Vinyl Flooring
Choosing the right vinyl flooring sets the foundation for a successful installation and lasting beauty. Your choice affects durability, comfort, and the overall look of your space. Understanding the options available helps you make a confident decision that fits your needs and style.
Types Of Vinyl Flooring
There are several types of vinyl flooring, each with unique features and benefits. The most common include:
- Sheet Vinyl:Comes in large, continuous rolls. It’s great for covering big areas with fewer seams, which means less chance of water damage.
- Vinyl Planks:Designed to mimic hardwood floors. These are easy to install and often click together, making them a popular DIY choice.
- Vinyl Tiles:Resemble ceramic or stone tiles but are softer and warmer. They offer flexibility in design with various shapes and patterns.
Consider the room’s use and your lifestyle. For example, sheet vinyl works well in bathrooms, while vinyl planks might be better for living rooms due to their realistic wood look.
Selecting The Right Style
Your vinyl flooring style should reflect your personal taste and the room’s function. Think about color, pattern, and texture. Do you want a sleek modern look or something more rustic?
Pay attention to the wear layer thickness. A thicker wear layer offers better protection against scratches and stains, especially in high-traffic areas. It’s a practical detail that can extend your floor’s life.
Imagine walking barefoot across your floor—do you prefer a smooth finish or a textured surface for extra grip? These small choices affect comfort and safety.
What mood do you want your space to convey? Bright, light colors can open up a small room, while darker tones add warmth and coziness. Your vinyl flooring is a big piece of the design puzzle.
Subfloor Preparation
Preparing your subfloor is the foundation of a successful vinyl flooring installation. Without a smooth, clean, and even surface, your new floor may develop bubbles, cracks, or uneven spots over time. Investing effort here saves you from costly repairs and frustration later.
Cleaning The Surface
Start by removing all debris, dust, and grease from your subfloor. Use a vacuum to suck up dirt and then mop the area with a mild detergent solution. If you skip this step, the vinyl may not stick properly, causing bubbles or lifting later on.
Have you noticed how a tiny piece of dirt can create a noticeable bump under your flooring? That’s exactly why thorough cleaning is non-negotiable.
Leveling The Subfloor
Check your subfloor for any bumps, dips, or cracks. Use a straightedge or level tool to spot uneven areas. Even small imperfections can cause your vinyl to wear unevenly or look wrinkled.
Fill holes and low spots with a patching compound, and sand down high spots until the surface is flat. Don’t rush this step—taking time here ensures your vinyl lays perfectly smooth.
Applying Underlayment
Underlayment acts as a cushion and moisture barrier beneath your vinyl flooring. It helps reduce noise and increases comfort underfoot. Choose an underlayment that matches your subfloor type and the vinyl flooring you selected.
Roll out the underlayment carefully, making sure there are no wrinkles or overlaps. Tape the seams securely to prevent shifting during installation. This extra layer might seem small, but it makes a big difference in the durability and feel of your floor.
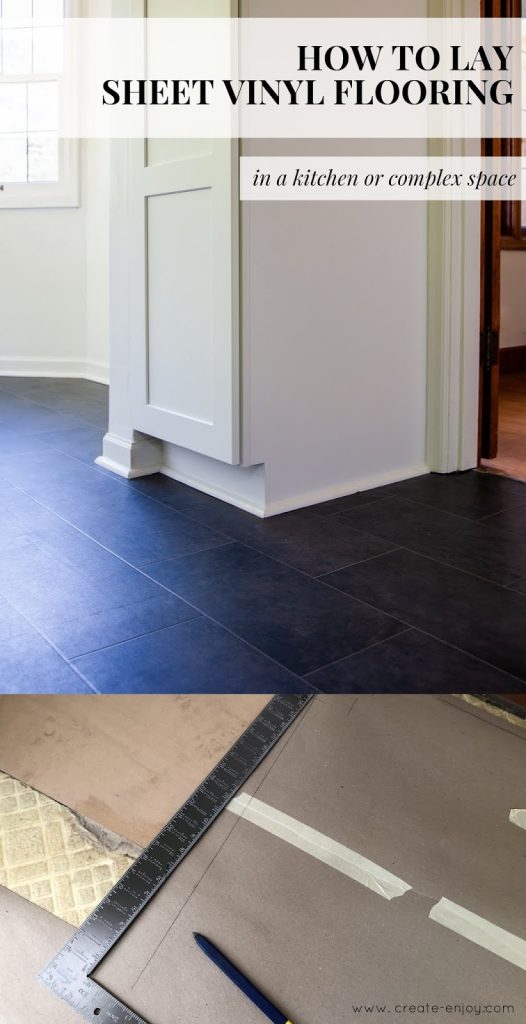
Cutting Vinyl Flooring
Cutting vinyl flooring is a crucial step in fitting it perfectly. It ensures each piece fits snugly around corners, edges, and fixtures. Precise cutting reduces waste and makes the floor look professional. Taking care during this process saves time and effort later.
Measuring And Marking
Accurate measurements guide clean cuts. Measure the area carefully, including any obstacles. Mark the vinyl using a pencil or chalk for clear lines. Double-check measurements before cutting to avoid mistakes. Marking straight lines helps in making precise cuts.
Using The Right Tools
Choose tools designed for cutting vinyl flooring. A sharp utility knife works well for straight cuts. Use a metal ruler or straight edge to guide the blade. For curved cuts, scissors or a vinyl cutter work better. Always cut on a stable surface to keep the vinyl steady.
Installation Process
The installation process of vinyl flooring can seem straightforward, but success lies in careful preparation and attention to detail. Taking your time during each stage ensures the floor looks seamless and lasts longer. Let’s break down key steps that will help you fit vinyl flooring like a pro.
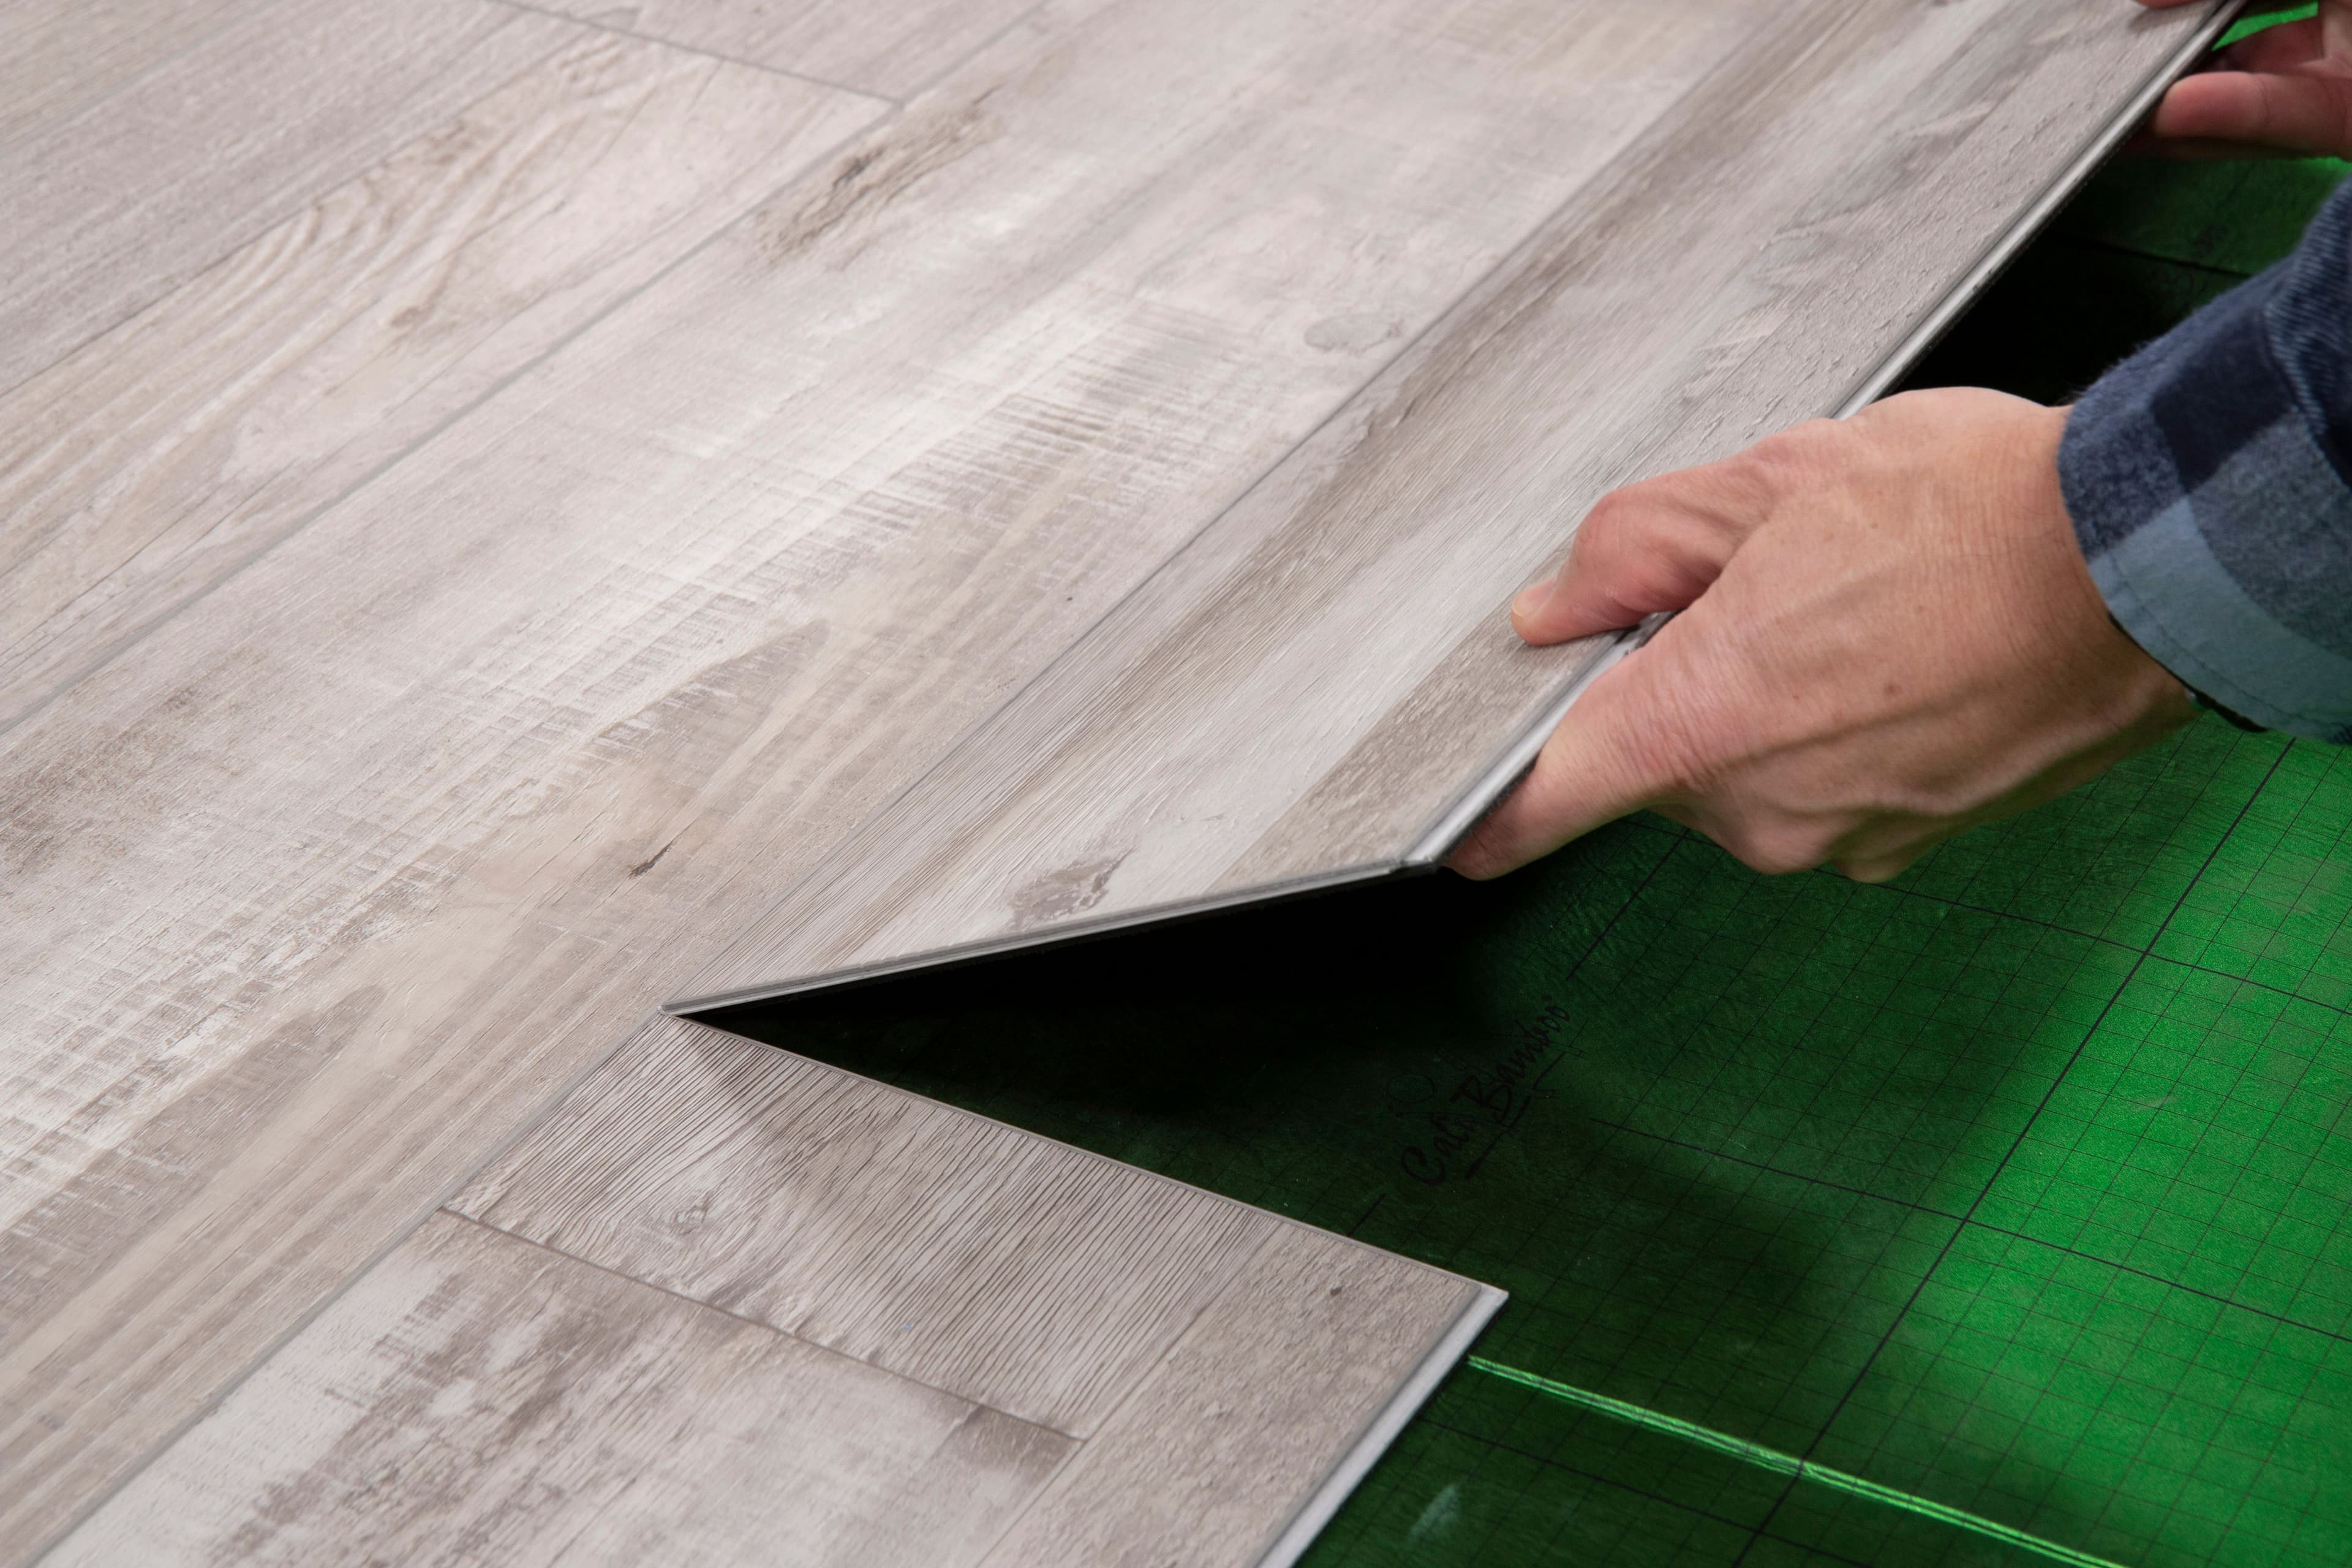
Dry Fitting Pieces
Before adding any adhesive, lay out your vinyl pieces on the floor to check the fit. This step helps you spot any cutting adjustments needed and prevents costly mistakes later.
Arrange the pieces carefully, aligning patterns or seams exactly where you want them. Walk over the layout to confirm everything stays in place and nothing shifts unexpectedly.
Have you noticed how a small misalignment during dry fitting can throw off the entire floor look? Catching these issues early saves frustration down the line.
Applying Adhesive
Choose the right adhesive for your vinyl type, whether it’s pressure-sensitive or wet glue. Apply it evenly using a trowel or roller, following the manufacturer’s instructions closely.
Work in small sections to avoid the glue drying before you lay the vinyl. A consistent adhesive layer prevents bubbles and lifts, making your floor smooth and secure.
Think about your workspace: is it well-ventilated? Proper airflow helps the adhesive cure faster and keeps you comfortable during the process.
Laying Down The Vinyl
Carefully place each vinyl piece onto the adhesive, starting at one corner and smoothing it down gradually. Use a roller to press out any air bubbles and ensure full contact with the floor.
Take your time here — pressing firmly but gently prevents damage while securing the vinyl in place. Pay special attention to edges and seams for a clean finish.
Have you ever tried to fix wrinkles after the vinyl is set? It’s tough. Getting it right the first time saves a lot of hassle.

Credit: www.tiktok.com
Finishing Touches
Finishing touches make vinyl flooring look professional and last longer. They protect edges, enhance shine, and ensure a smooth, clean surface. Small details help avoid damage and improve overall appearance.
Sealing Edges
Seal all edges with a suitable vinyl flooring sealant. This prevents water from seeping underneath. Use a small brush or applicator to apply sealant evenly. Pay close attention to corners and seams. Let it dry fully before walking on the floor.
Cleaning And Polishing
Clean the floor using a gentle vinyl cleaner. Avoid harsh chemicals that can damage the surface. Use a soft mop or cloth for cleaning. After cleaning, apply a polish made for vinyl floors. This adds shine and protects the finish. Buff lightly with a dry cloth for a smooth look.
Inspecting Final Result
Walk around the room and check every section. Look for gaps, loose edges, or uneven areas. Make sure the surface is clean and polished. Fix any small issues immediately to avoid bigger problems. A careful inspection ensures your vinyl floor looks perfect and lasts long.
Maintenance Tips
Keeping your vinyl flooring looking fresh and new requires some simple maintenance habits. You don’t need fancy tools or products—just a little effort and the right approach. By caring for your floors properly, you can enjoy their beauty and durability for years to come.
Regular Cleaning Practices
Start with sweeping or vacuuming your vinyl floor regularly. Dirt and grit can act like sandpaper, wearing down the surface over time. Use a soft broom or a vacuum without a beater bar to avoid scratches.
Next, mop your floor with warm water and a mild cleaner designed for vinyl. Avoid harsh chemicals that can dull the finish or cause damage. A microfiber mop works well to pick up dirt without excess water.
Don’t forget to dry the floor after mopping. Standing water can seep into seams and edges, leading to lifting or warping. Quick drying helps keep your vinyl in top shape.
Avoiding Damage
Protect your vinyl flooring from heavy furniture by adding felt pads under chair and table legs. This simple step prevents scratches when you move furniture around. Have you ever moved a chair only to find a scratch where it once stood?
Keep sharp objects away from the floor, and clean spills immediately. Liquids like wine or coffee can stain if left too long. A damp cloth and gentle cleaner can handle most spills before they cause harm.
Consider placing rugs in high-traffic areas and entryways. These act as a first line of defense against dirt and moisture. Just make sure your rugs have non-slip backing to avoid accidents and don’t trap moisture underneath.

Credit: www.youtube.com
Frequently Asked Questions
What Tools Are Needed To Fit Vinyl Flooring?
You need a utility knife, measuring tape, straight edge, roller, and adhesive. These tools help ensure precise cuts and a smooth installation.
How Do You Prepare The Floor For Vinyl Fitting?
Clean, dry, and level the subfloor. Remove debris, fill holes, and ensure the surface is smooth for better vinyl adhesion.
Can Vinyl Flooring Be Installed Over Existing Floors?
Yes, vinyl can be installed over many existing floors if they are smooth and level. Avoid uneven surfaces to prevent damage.
How Long Does It Take To Fit Vinyl Flooring?
It usually takes 1-2 days depending on room size and experience. Proper preparation and careful installation speed up the process.
Conclusion
Fitting vinyl flooring can be simple with careful steps. Measure your space well before cutting the vinyl. Use the right tools for clean, straight edges. Take your time to align each piece properly. A good fit means a smooth, attractive floor.
Clean the area before you start laying the vinyl. Practice patience and stay focused throughout the process. Your room will look fresh and neat once done. Enjoy the new look and easy maintenance of vinyl flooring.